
Your lead arm points where you want the board to go, and your back arm bends to roughly 90 degrees to keep you balanced. That’s the whole cue. Look at the spot on the wave you want to reach, extend your front arm toward it, and let your hips and shoulders follow naturally.
Try this on your very next wave:
- Eyes first: find your target down the line before you even pop up.
- Lead arm second: point it at that target and let it stay there through the turn.
- Hips third: let your shoulders and hips rotate to match where the arm is already pointing.
Keep your shoulders loose, not locked. And if you fall, get your hands up near your head as you surface. Boards and fins don’t wait for beginners to find their footing.
Key Takeaways
Correct arm positioning, a pointed lead arm and a 90-degree back arm, drives balance, turning speed, and paddling efficiency more than any other single technique adjustment for beginners.
| Point | Details |
|---|---|
| Lead arm points, eyes follow | Point your lead arm at your target and look there first; the board follows both. |
| Back arm bends near 90 degrees | This opens your chest, prevents hunching, and gives you a counterweight during turns. |
| Exaggerate drills, then shrink them | Start with big, obvious arm movements on land and in whitewater, then dial them back as the motion becomes automatic. |
| Fix one habit at a time | Tackle floppy arms, crossed arms, or looking down separately rather than all at once. |
| Coaching accelerates correction | Real-time feedback from an instructor fixes bad arm habits faster than solo practice alone. |
Table of Contents
- Surf Arm Positioning Explained for Beginners: The Biomechanics
- Where to Put Your Leading Arm and How to Practice It
- Your Back Arm Is a Stabilizer, Not an Afterthought
- Common Arm Mistakes Beginners Make (And Quick Fixes)
- A 30-Minute Practice Routine to Build Arm Memory
- How Hans Hedemann Surf School Teaches Arm Positioning
- How Arm Position Changes Your Paddling Speed
- Adjusting Your Arms for Different Wave Types
- Beginner Arms vs. Pro Arms: What Actually Changes
- What Beginners Get Wrong About Arm Cues
- Frequently Asked Questions
- Sources
Surf Arm Positioning Explained for Beginners: The Biomechanics
Your arms aren’t decoration. They’re steering input, and the board reads them constantly.
When you extend your lead arm toward where you want to go, you create rotational torque that starts in your shoulders and travels down through your hips into the board’s rail. This isn’t a metaphor. Turning a surfboard works the same way turning your body works on land: shoulders rotate, hips follow, and whatever is underneath you (skis, a bike, a board) tracks that rotation. Surf Science’s coaching guidance on lead-arm pointing confirms what most instructors already tell beginners on day one: the board goes where your body tells it to go, and your arm is the clearest signal you can send.
Looking where you want to go matters just as much as the arm itself, and the two reinforce each other. Your head turns, your torso follows, your arm extends toward the same point, and suddenly you’ve got three body parts agreeing on one direction instead of fighting each other.
Ignore your arms and you’ll notice the same three problems over and over. Turns happen too late because your body had no early signal to rotate. Balance gets shaky because your arms are flailing for stability instead of contributing to it. And worst of all, you over-rotate. Without a lead arm holding a fixed point, your shoulders keep spinning past where you meant to stop, and you end up sideways or in the water. Arm position isn’t a finishing touch you add once the basics click. It’s one of the basics.
Where to Put Your Leading Arm and How to Practice It
Your leading arm sits out in front of you, roughly in line with your front foot, pointed toward wherever the wave lets you go next. Not down at the water. Not tucked against your chest. Extended, with a slight bend at the elbow, aimed at your target the way a boxer’s jab aims at a spot rather than a general direction.
The mechanics are simple once you isolate them. As you pop up, your lead hand should already be reaching toward the direction you plan to ride. If you’re going right, that arm extends right and slightly forward. If you’re cutting back toward the whitewater, it points there instead. The arm leads. The board catches up.
Three drills build this fast, and none require water:
- Exaggerated pointing on land. Stand in a surf stance on the sand or your living room floor. Pick a target, point your lead arm at it like you’re aiming a rifle, and rotate your hips and shoulders to match. Hold for three seconds. Repeat 15 to 20 times, switching targets each round.
- Target vision drills. Before you even touch the board, practice scanning a room or beach, picking a fixed point, and snapping your eyes and arm to it simultaneously. This trains the eye-arm link that Surf Science identifies as the fastest way to simplify the whole motor pattern, since beginners often treat their arms as separate from the rest of the body instead of an extension of it.
- Pop-up with lead-arm focus. On the board (land or water), pop up in three phases: hands push, feet land, lead arm extends toward your chosen line. Do this slowly at first. Speed comes later.
Progression matters more than most beginners realize. Start in small whitewater where the wave energy is forgiving and mistakes don’t cost you much. Once the pointing motion feels automatic there, move to larger green waves where the stakes for bad timing go up. Breakthrough Surf School’s coaching approach backs this up directly: exaggerate the movement early to build the correct neuromuscular pattern, then dial it back to something more natural as the motion becomes second nature.
Pro Tip: Pick a physical landmark on shore, like a lifeguard tower or a distinct rock, before you paddle out. Point your lead arm at that exact object during every practice wave. A fixed reference point trains your brain faster than a vague “somewhere down the line.”
Your Back Arm Is a Stabilizer, Not an Afterthought
Bend your back arm to roughly 90 degrees and keep your elbow away from your body. That single adjustment fixes more posture problems than any other single tweak a beginner can make.
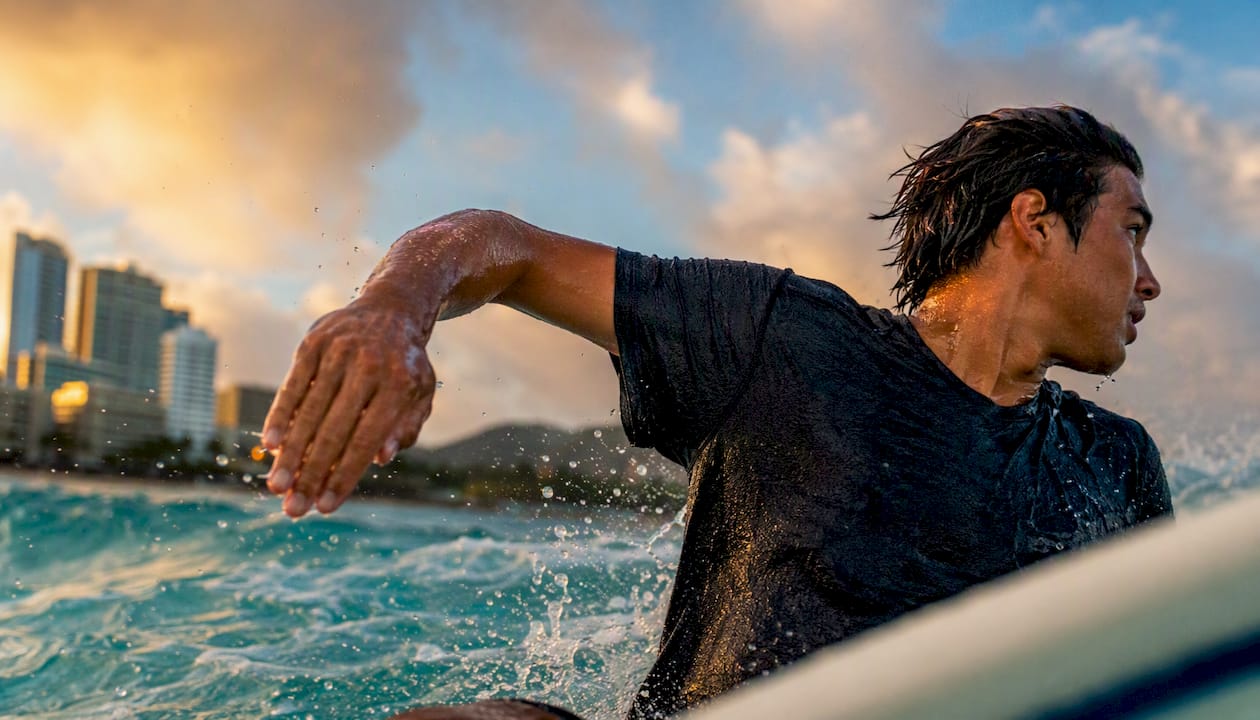
Here’s why the bend matters. A straight or dangling back arm collapses your chest inward, which pulls your shoulders down and forward. Surfers call the resulting posture the “pooh stance,” a hunched, low-chested crouch that looks like you’re bracing for impact rather than riding a wave. Bending the back arm at roughly 90 degrees opens the chest back up and pulls your shoulders into a position where they can actually rotate freely instead of fighting your own posture.
Beyond posture, the back arm does real functional work:
- It acts as a counterweight during turns, especially sharp ones where your lead arm is extended hard toward the target.
- Small adjustments in the back arm’s angle help you fine-tune rotation without overcorrecting with your hips.
- Keeping the elbow up and away from your ribs gives you a faster reaction if you need to brace during a wipeout.
If you catch yourself hunching, the fix is almost embarrassingly simple: bend the elbow, pull it slightly back and away from your body, and feel your chest open. Do this as a mid-wave micro-correction, not just something you fix between waves. The best surfers make this adjustment without thinking about it because they trained it into a reflex early, usually through the exact kind of repetition drills covered in the practice routine below.
Common Arm Mistakes Beginners Make (And Quick Fixes)
Most beginner arm problems fall into a short, predictable list. Once you know what to look for, they’re fast to correct.
- Arms drifting over the toe rail. This pulls your weight forward and down, which stalls the board or buries the nose. Fix: keep both arms inside your body’s width, not reaching past the rail.
- Floppy, disconnected arms. Arms that hang loose or flail during a turn send no signal to the board at all. Fix: exaggerate the pointing motion until it feels almost silly. Dial it back once it’s automatic.
- Crossing arms during a turn. Beginners often let the back arm swing across the body when the lead arm reaches for a sharp turn. Fix: keep the back arm bent and stationary, moving only in small increments, while the lead arm does the reaching.
- Looking down at the board instead of the target. Your eyes anchor the whole chain. Look down and your arms, shoulders, and hips have nothing to aim at. Fix: pick a fixed point on shore before every wave and keep your eyes there through the turn.
Fixing any of these usually comes down to one of a few reliable methods. Exaggeration drills on land, the same ones used to teach the lead arm, work just as well for correcting floppy or crossed arms. Filming yourself, even on a phone propped on the beach, shows you exactly what your arms are doing in ways you can’t feel in the moment. A friend or instructor watching from shore can call out corrections in real time, and coaching feedback consistently speeds up motor learning compared to guessing alone. And if you’re overwhelmed trying to fix everything at once, simplify. Focus only on the lead arm for a full session, then only on the back arm the next. Trying to fix four habits simultaneously usually fixes none of them.
A 30-Minute Practice Routine to Build Arm Memory
You don’t need hours to make this stick. You need focus and repetition, structured the right way.
Here’s a session that works whether you’re practicing on a beach in Waikiki or a quiet stretch of coastline anywhere else:
- Warm up and observe (10 minutes). Sit on the sand and watch the waves before you paddle out. Note where they break, how fast they move, and where a rider would naturally point their lead arm on a typical ride. Surf Science recommends this kind of observation period specifically because it lets you visualize your arm placement and turn timing before you’re under pressure in the water.
- Dry-land drills (15 minutes). Run through pop-up repetitions with lead-arm pointing, alternating with target-vision drills where you snap your eyes and arm to a fixed object. Do at least 15 to 20 reps of each.
- Whitewater repetition (5 to 10 minutes). Take the same cues into small, forgiving whitewater. Focus only on pointing and looking, not on speed or style.
- Five focused green-wave attempts. Once whitewater feels automatic, take five attempts on slightly larger, unbroken waves. Apply the same lead-arm and back-arm cues you just drilled.
Measuring progress doesn’t require a stopwatch or a scorecard. Watch for three signs instead: pop-ups that feel stable rather than wobbly, turns that happen earlier and smoother instead of late and jerky, and noticeably less arm flailing when you catch a wave. Efficient paddling and a stable pop-up are what make the arm cues possible in the first place. If your pop-up is still shaky, spend extra time there before worrying about arm precision. Our cross-training guidance covers exercises that build the core stability this whole routine depends on.
How Hans Hedemann Surf School Teaches Arm Positioning
Solo practice gets you partway there. A trained eye gets you the rest of the way, faster.
At Hans Hedemann Surf School, instructors watch your very first pop-up and correct arm placement before a bad habit has a chance to set in. That’s the core of the school’s beginner methodology: individual attention on the water, not a lecture on the sand followed by guesswork. Most students catch and ride a wave in their first lesson, and a big part of that comes down to real-time correction of exactly the arm mistakes covered above.
A beginner who hears “lead arm up, point at the beach, now” while actually riding a wave learns that cue faster than a week of unguided practice ever could. On-water correction closes the gap between knowing the theory and feeling it in your body.
If you book a lesson, tell your instructor directly that you want to work on arm positioning. Mention whether you’re struggling with the lead arm, the back arm, or both. Our Waikiki surf lessons page outlines what a typical session covers, and a specific request like that lets your instructor target their feedback instead of guessing at your weak points.
How Arm Position Changes Your Paddling Speed
Everything you do with your arms before you stand up sets up everything you do with them once you’re riding.
Paddling efficiently means alternating long, steady strokes while keeping your chest up and your lower back slightly arched. This posture matters for a reason beginners rarely connect to arm positioning: the same shoulder and chest openness that makes for good paddling technique is exactly the posture that sets up a clean pop-up into a proper lead-arm and back-arm stance. Paddle hunched with your chest down, and you’ll pop up hunched too, right into the “pooh stance” that collapses your back arm’s angle before you’ve even caught the wave.
Sloppy, splashy strokes waste energy you’ll need for the pop-up itself. Beginners who paddle with short, choppy strokes often arrive at their pop-up already fatigued, which means the arms go wherever gravity and panic take them rather than where the turn requires. Steady, full strokes conserve enough energy that your arms have something left to work with the moment you’re on your feet.
There’s a timing element too. Paddling faster into a wave gives you an extra half second at the top of your pop-up to find your target and get your lead arm oriented before the wave’s energy takes over. That extra half second is often the difference between a controlled first turn and a scramble to catch up with a board that’s already decided its own direction.
Adjusting Your Arms for Different Wave Types
The 90-degree back arm and pointed lead arm are your defaults, but conditions change how much you rely on them.
In small, mushy whitewater, exaggerate everything. Slower-moving water gives you more time to correct, so lean into wide, obvious arm movements while you’re still building the habit. As waves get steeper or faster, particularly on a greener, unbroken face, your movements need to shrink and sharpen. A wide, slow arm swing on a fast-breaking wave arrives too late to matter. Aim for smaller, quicker adjustments that still hit the same target, just with less exaggeration and more precision.
Choppy or crumbly waves demand a slightly lower back-arm position for extra stability, since the surface underneath you is less predictable. Clean, glassy conditions let you extend both arms a bit further out, since balance is easier to hold and a fuller extension gives you a stronger steering signal. Longer, gentler rolling waves, the kind beginners usually start on, reward patience: hold your lead-arm point longer before initiating the turn, since the wave gives you more runway to work with. Our guide to different wave types breaks down how each break behaves, which helps you anticipate which arm adjustments a given session will call for before you even paddle out.
Beginner Arms vs. Pro Arms: What Actually Changes
Watch a professional surfer and a first-week beginner side by side, and the arm mechanics look almost unrecognizable, even though the underlying principle is identical.
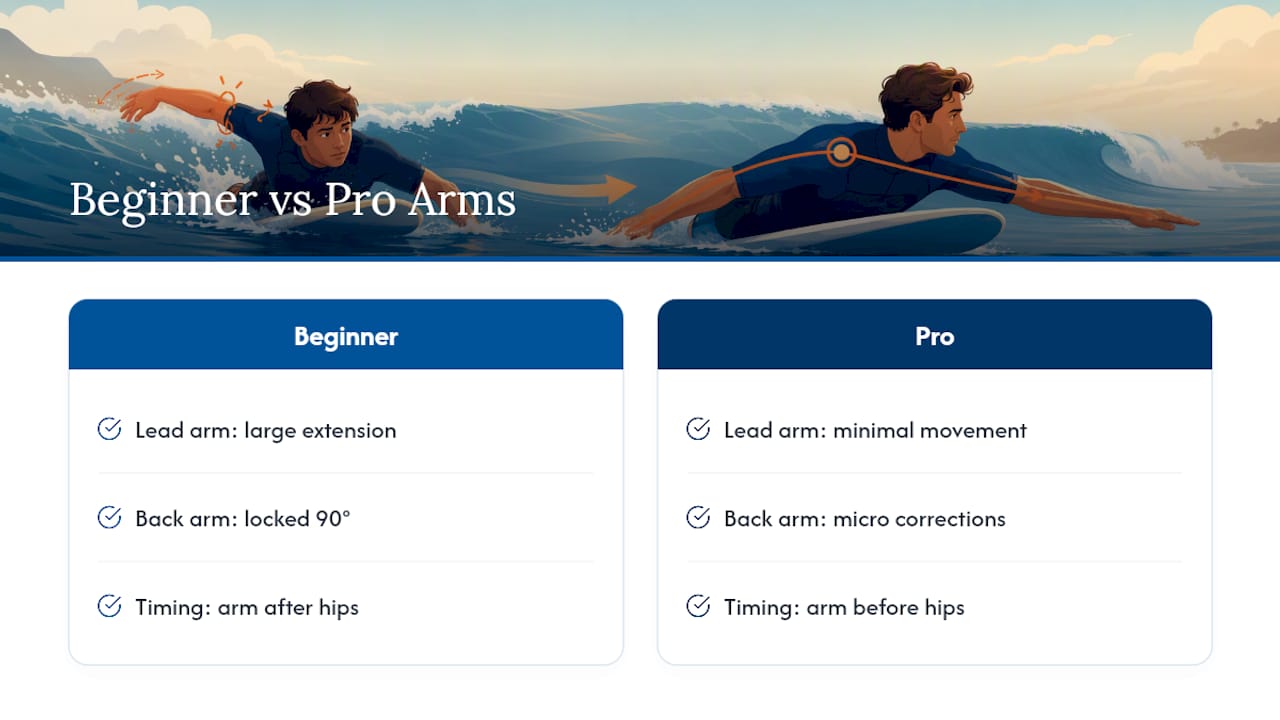
Beginners need big, deliberate signals. The exaggerated pointing drills covered earlier exist because a beginner’s body hasn’t yet built the automatic link between eyes, arm, and hip rotation. Every motion has to be conscious and oversized to register at all.
Professional surfers have compressed that same signal into something almost invisible. Their lead arm might extend only a few inches, or barely lift, yet it still carries the same rotational intent because years of repetition turned a conscious motor pattern into a reflex. Where a beginner’s back arm sits locked at a fixed 90-degree angle for stability, a pro’s back arm makes constant tiny adjustments, functioning more like a rudder making micro-corrections than a static brace.
The other real difference is timing. Beginners tend to move their arms after their hips start turning, playing catch-up. Pros move the arm first, sometimes by a fraction of a second, and let the rest of the body follow. That sequencing, arm before hips, is largely what separates a smooth, early turn from a late, jerky one. It’s also exactly what the exaggerated pointing drills are training you to build, just at beginner speed instead of pro speed.
What Beginners Get Wrong About Arm Cues
Most beginner advice treats arm positioning as a footnote to stance and pop-up mechanics. That’s backwards. The arms are the signal that makes stance and pop-up mechanics mean anything at all.
The conventional wisdom leans hard on stance width and foot placement, and those matter, but a beginner with perfect footwork and dead arms will still turn late and lose balance. What gets underestimated is how much a single pointed arm simplifies everything else. You stop thinking about six separate body parts and start thinking about one: where does the arm point? Everything else, the hip rotation, the shoulder turn, even the eventual pop-up timing, organizes itself around that one decision.
If you take one thing from this article, prioritize the lead-arm drill over every other technique tip you’ve read. Footwork adjustments and balance tricks matter eventually. But the fastest path from flailing to flowing is a beginner who has drilled “point and look” until it’s reflex, on land, before ever paddling into whitewater. Everything else builds on that.
Frequently Asked Questions
Where exactly should my lead arm point while surfing?
Point it toward the direction you want the board to travel, roughly in line with your front foot, extended with a slight elbow bend rather than locked straight.
How bent should my back arm be?
Aim for roughly 90 degrees. This keeps your chest open, prevents hunching, and gives you a stable counterweight through turns.
Why does looking where I want to go help my arm positioning?
Your eyes, arm, and hip rotation work as one connected system. Looking at your target first helps your lead arm and torso rotate in the same direction automatically instead of fighting each other.
How long does it take to fix bad arm habits as a beginner?
It varies by how much you practice, but exaggerated land drills combined with immediate feedback, from video or an instructor, tend to correct habits faster than unguided water time alone.
Should I focus on my lead arm or back arm first?
Start with the lead arm since it drives direction and turning. Once pointing feels automatic, shift focus to the back arm’s bend and stability role.
Sources
For visual breakdowns of arm mechanics, Surf Science’s steering guide and Surfer’s beginner walkthrough cover the fundamentals in depth. Breakthrough Surf School’s turning guide walks through drill progressions. For a hands-on next step, our how to surf page details what a lesson covers.
- Steer with your hands — Surf Science
- How to surf: The ultimate beginner’s guide with pro tips — Surfer
- How to turn on your surfboard for beginner surfers — Breakthrough Surf School
0 Comments